Pageviews and session counts only scratch the surface of user behavior. Businesses need to track the actions that actually drive revenue. Google Tag Manager custom events make that level of tracking possible, without requiring heavy developer involvement every time. GTM gives marketers full control over event tracking through a visual interface.
| What you’ll learn in this article: ● What Are Google Tag Manager Custom Events? ● How Custom Events Work in Google Tag Manager ● Setting Up a Google Tag Manager Custom Event Trigger ● Common Use Cases for GTM Custom Events ● Best Practices for Accurate Event Tracking |
What Are Google Tag Manager Custom Events?
A Google Tag Manager (GTM) custom event is a user defined trigger that fires when a specific action occurs on your website. You decide what counts as an event and when GTM should respond to it.
GTM offers two types of triggers. Built in triggers cover broad, generic interactions like page views, clicks, form submissions, scroll tracking, and timer based events. These standard events are useful for basic website activity tracking without extra setup.
Custom events, on the other hand, let you track specific actions that standard GTM triggers cannot fully capture. Some common examples include:
- Button clicks on a specific CTA
- Form submissions on a checkout or lead page
- Video plays on a product demo
- Scroll depth milestones
- Add to cart or purchase interactions
- Login, signup, or subscription events
When GTM custom events are configured correctly, your analytics data reflects real user intent rather than just traffic volume. As a result, your team gains cleaner data for conversion tracking, funnel analysis, audience segmentation, and remarketing.
How Custom Events Work in Google Tag Manager
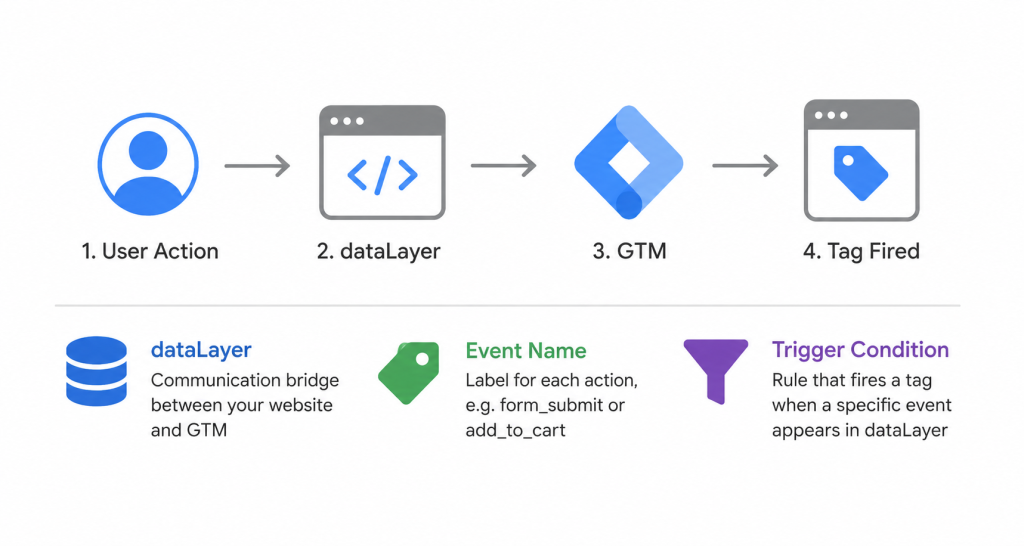
Before setting up any custom event, you need to understand the flow behind it. Every custom event in GTM follows four steps:
- A user performs an action on your website
- Your website pushes that action to the dataLayer
- GTM listens for the event in the dataLayer
- The matching trigger fires the tag
Three core concepts power this flow.
dataLayer is a JavaScript array that acts as a communication bridge between your website and GTM. When an action occurs, your site pushes structured data into the dataLayer so GTM can read it.
Event name is the label you assign to each action, for example form_submit or add_to_cart. GTM uses this name to identify which trigger to activate.
Trigger condition is the rule you define inside GTM. It tells GTM to fire a tag only when a specific event name appears in the dataLayer.
Setting Up a Google Tag Manager Custom Event Trigger
Before configuring anything inside GTM, your website needs to push the event to the dataLayer first. Without that, GTM has nothing to listen for.
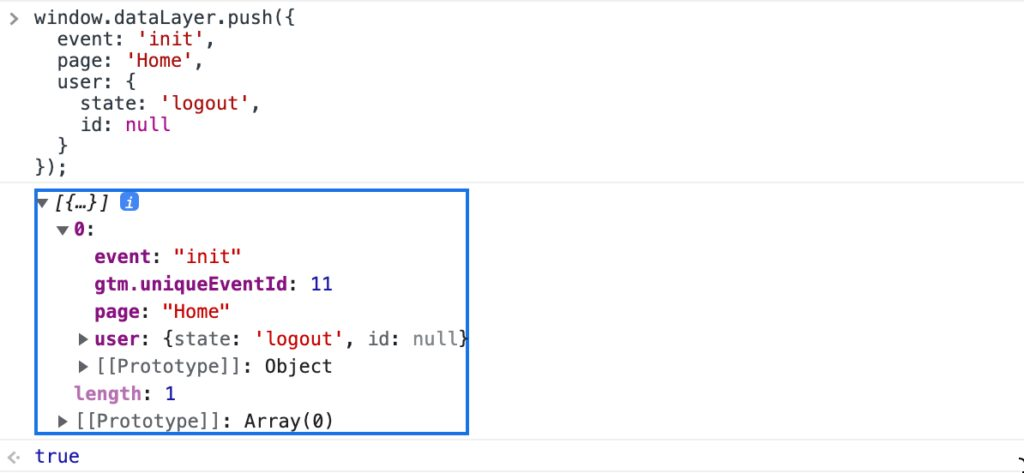
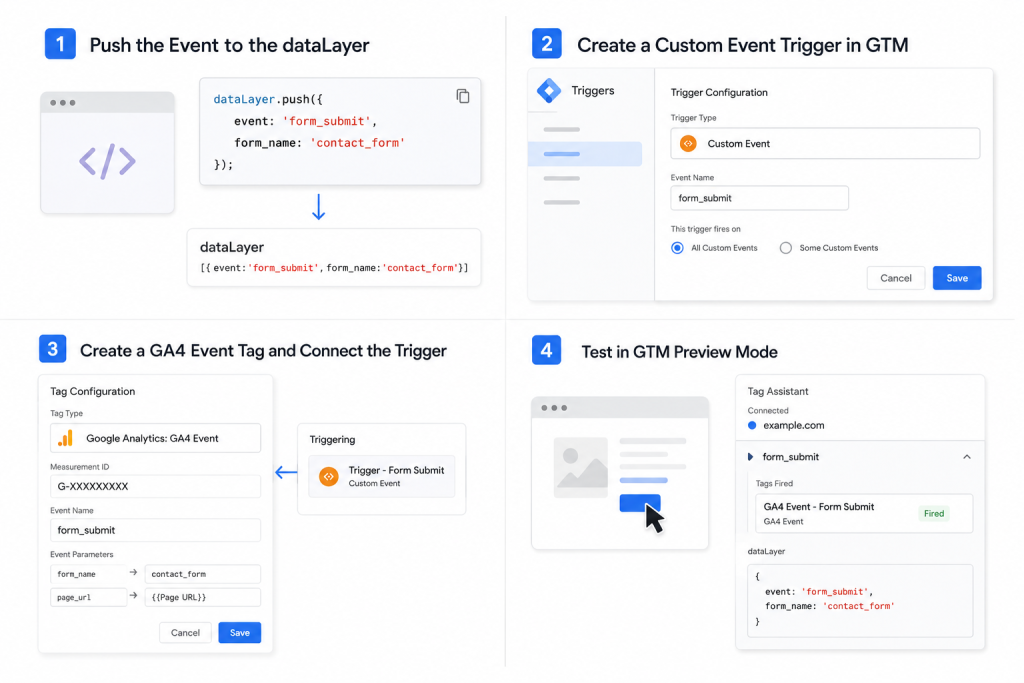
Step 1: Push the Event to the dataLayer
Work with your developer to add a dataLayer.push() snippet that fires at the right moment. For example, a form submission event looks like this:
dataLayer.push({
event: ‘form_submit’,
form_name: ‘contact_form’
});
The event key is what GTM will use to identify and match the trigger. Make sure the developer fires this code only after the action completes successfully, not before.
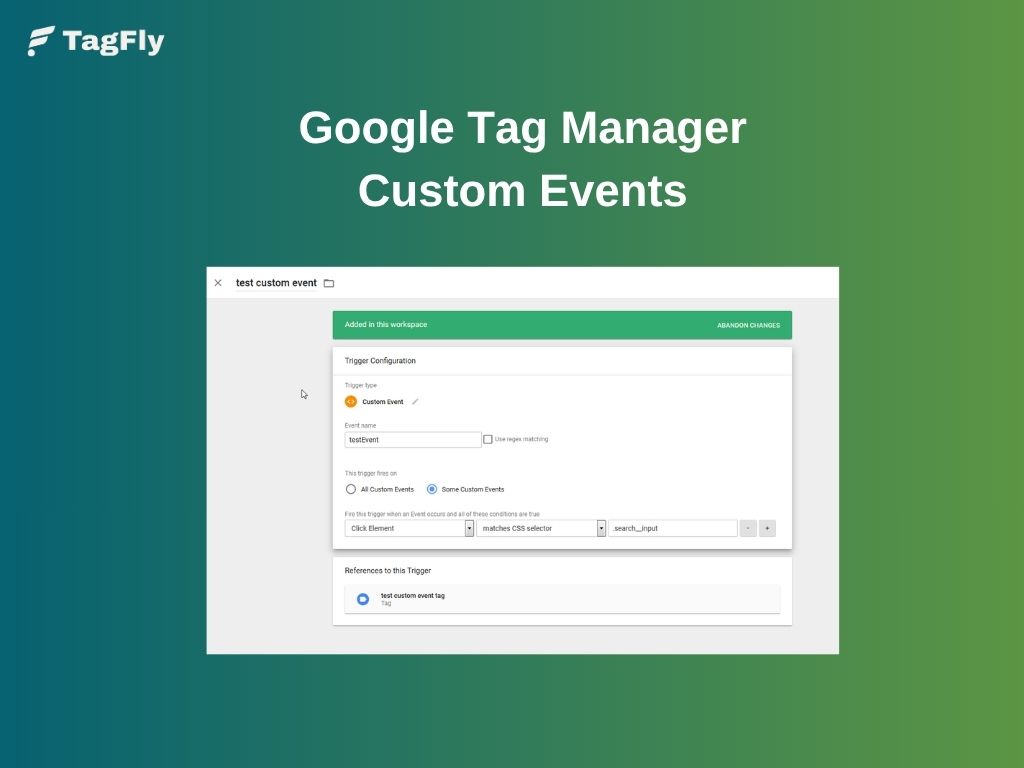
Step 2: Create a Custom Event Trigger in GTM
Once the dataLayer push is live, head into GTM to create the trigger.
- Go to Triggers in the left menu, then click New
- Click Trigger Configuration and select Custom Event
- In the Event Name field, enter the exact event name you pushed to the dataLayer (e.g., form_submit)
- Choose whether the trigger fires on All Custom Events or only when specific conditions are met
- Name the trigger clearly (e.g., Trigger – Form Submit) and save
Step 3: Create a GA4 Event Tag and Connect the Trigger
- Go to Tags, then click New
- Click Tag Configuration and select Google Analytics: GA4 Event
- Enter your Measurement ID (found in GA4 under Admin > Data Streams)
- Fill in the Event Name field with the name you want to appear in GA4 reports (e.g., form_submit)
- Add any event parameters you need, such as form_name or page_url
- Under Triggering, select the trigger you created in Step 2
- Name the tag clearly (e.g., GA4 Event – Form Submit) and save
Step 4: Test in GTM Preview Mode
Before publishing, always validate the setup in Preview mode.
- Click Preview in the top right corner of GTM
- Enter your website URL and interact with the page to trigger the event
- In the Tag Assistant panel, confirm the tag fires under the correct event
- Check the dataLayer tab to verify the event name and parameters are passed correctly
After confirming the trigger works in GTM, validate that the event is also received inside GA4.
- Open GA4 and go to Admin > DebugView or Realtime > DebugView
- Trigger the event again on your website while Preview mode is active
- Confirm the custom event appears in the DebugView event stream
- Click the event to verify parameters such as form_name, page_url, or other custom values are passed correctly
Google Tag Manager vs gtag Custom Events
Many teams use either GTM or gtag to send custom events to Google Analytics. However, the two approaches differ significantly in how events are managed and deployed.
GTM Custom Events
With GTM, developers still need to implement the initial dataLayer.push() code on the website so GTM can detect the event.
However, once that instrumentation is in place, marketers and analysts can usually create or modify tags, triggers, and event mappings directly inside the GTM interface without requiring additional code deployments for every change.
gtag Custom Events
With gtag, developers write event tracking code directly into the website source code using gtag() commands. Any event changes, parameter updates, or tracking adjustments typically require another code deployment.
| GTM Custom Events | gtag Custom Events | |
|---|---|---|
| Who manages it | Marketers | Developers |
| Code deployment needed | Yes | Yes |
| Flexibility | High | Limited |
| Setup location | GTM interface | Website source code |
👉 For teams that prioritize speed and flexibility, GTM custom event triggers are the more practical choice for managing and scaling event tracking without relying on engineering resources.
Common Use Cases for GTM Custom Events
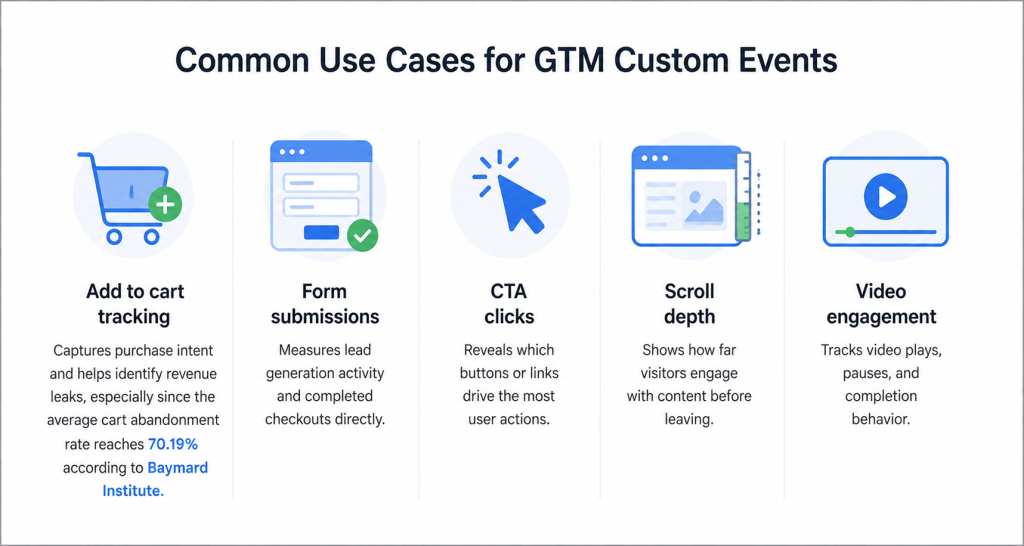
GTM custom events work across a wide range of tracking scenarios. Some of the most common use cases include:
- Add to cart tracking: Captures purchase intent and helps identify revenue leaks, especially since the average cart abandonment rate reaches 70.22% according to Baymard Institute
- Form submissions: Measures lead generation activity and completed checkouts directly
- CTA clicks: Reveals which buttons or links drive the most user actions
- Scroll depth: Shows how far visitors engage with content before leaving
- Video engagement: Tracks video plays, pauses, and completion behavior
When these events are configured correctly, your marketing data becomes far more reliable. Conversion tracking improves because you measure real customer actions instead of simple traffic numbers.
Meanwhile, funnel analysis becomes clearer by showing where users actually drop off, while remarketing audiences stay more accurate thanks to behavior-based data rather than basic pageviews.
Common GTM Custom Event Mistakes
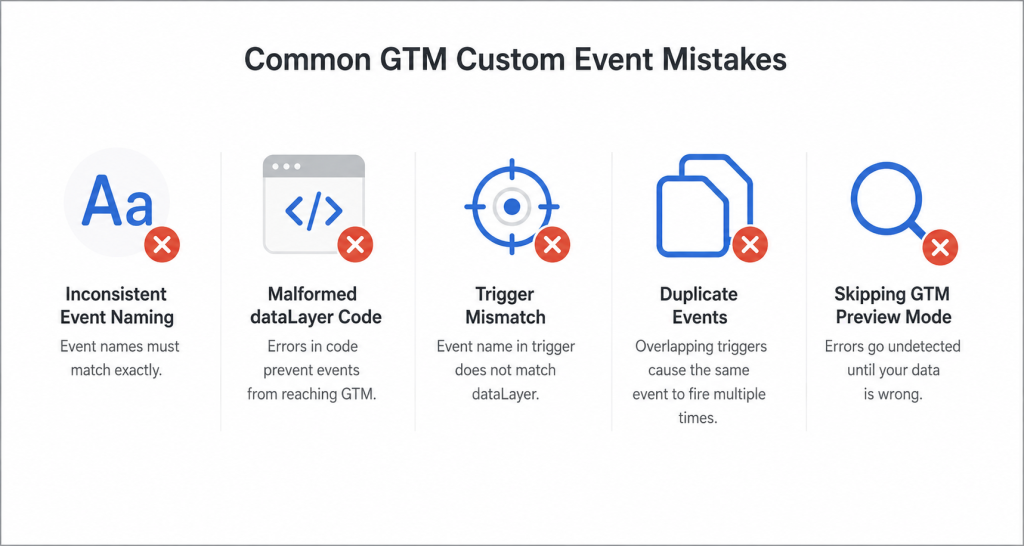
Most tracking errors in GTM come from small, avoidable mistakes rather than complex technical failures.
Inconsistent Event Naming
GTM matches event names exactly. If your dataLayer pushes form_submit but your trigger listens for formSubmit, the tag will never fire.
To avoid this, establish a naming convention early and apply it consistently across every event from the start.
Malformed dataLayer Code
A missing bracket, incorrect key, or wrong variable structure means GTM receives nothing, the event fires on the page but never reaches GTM.
For that reason, always validate the dataLayer push with a developer before moving on to the trigger setup.
Trigger Mismatch
A trigger condition that does not align with the actual event name causes silent failures. The tag appears active in GTM but produces no data in your reports.
Before publishing, double-check that the event name in your trigger exactly matches what the dataLayer sends.
Duplicate Events
Overlapping trigger conditions can cause the same event to fire multiple times per user action, which results in inflated numbers across your analytics reports.
To prevent this, review each trigger carefully and ensure no two conditions overlap on the same event.
Skipping GTM Preview Mode
Publishing without testing in GTM Preview mode leaves errors undetected until the data already looks wrong in your reports.
Preview mode shows exactly which triggers fire and what the dataLayer receives, making it the fastest way to catch issues before they go live.
Best Practices for Accurate Event Tracking
A clean GTM setup does not happen by accident. These four practices keep your event tracking reliable and maintainable over time.
Manage Everything in One Place
Even with a solid tracking plan, keeping tabs on every active event across a growing Shopify store can get messy fast. TagFly centralizes your GTM event tracking setup and also lets merchants create and test custom events directly inside the app without relying heavily on manual GTM configurations.
For example, you can set up custom tracking events for specific user actions and validate whether they fire correctly before pushing changes live.
Use a Consistent Naming Convention
Pick a format and stick with it across every event. Most teams use snake_case, for example form_submit, add_to_cart, or video_play.
Without a fixed convention, event names become inconsistent across tags, which leads to fragmented data and triggers that silently fail.
Keep Event Structure Clean
Each event should carry only the parameters it actually needs. Otherwise, overloading events with unnecessary data makes reports harder to read and increases the risk of mismatched variables in GA4.
As a rule, if a parameter does not directly inform a business decision, leave it out.
Test Before Every Publish
Use GTM Preview mode before pushing any changes live. Specifically, verify that the correct trigger fires, the dataLayer receives the right data, and no duplicate events appear.
One round of testing saves hours of debugging later.
Document Your Tracking Plan
Maintain a simple spreadsheet that lists every event name, its trigger condition, associated tags, and the team member responsible.
Without documentation, tracking setups become difficult to audit, especially when team members change or new events are added months later.
Bring It All Together
Google Tag Manager custom events give you a fundamentally different level of insight compared to standard pageview tracking. Instead of measuring traffic, you measure intent, the specific actions that reflect what users actually want.
The real advantage of GTM is scalability. You can start with two or three high-priority events like form submissions and add-to-cart clicks, then expand your tracking plan gradually as your analytics maturity grows.
If you need a structured way to manage your tags and event tracking setup, TagFly gives you the tools to build and maintain a clean GTM implementation from the ground up.