Track conversion on Shopify, which measures ROAS, or simply for better marketing decisions. Running marketing campaigns without this would mean running campaigns blindly, not knowing which actually produces sales.
| In this article, you’ll learn: ● What conversion tracking on Shopify is and why it matters. ● How to set up Google Ads conversion tracking using GTM or TagFly. ● How to configure Google Analytics (GA4) conversions step by step. ● Best practices to keep your tracking accurate, compliant, and insightful. |
What is Conversion Tracking on Shopify?
Conversion tracking refers to the process of recording specific actions of customers in a Shopify store while sending data over to analytics or advertising agencies. These actions are called conversions, and they include anything from filling an order to putting a product in a cart to signing up for a newsletter.
In the Shopify world, conversion tracking is important because it tells which campaigns and traffic sources actually bring in sales. For instance, if a customer clicks through a Google Ads campaign and completes a purchase, conversion tracking attributes the order back to the ad with a clear view of the ROAS.
Why You Need Conversion Tracking on Shopify
Without conversion tracking, it’s almost impossible to know if your marketing is paying off. Here’s why it matters:
Optimize Ad Campaigns With Real Shopify Data
Shopify conversion tracking links ad spend to actual store revenue. Instead of guessing which campaign worked, you’ll know exactly which TikTok or Google Ads drove completed checkouts, not just clicks.
And because Shopify feeds this data back to ad platforms, your campaigns can use smart bidding to prioritize the highest-value actions (like purchases over views), leading to better ROAS.
Reveal the Checkout Bottlenecks
By tracking conversions within Shopify, you can see where customers drop off, on the product page, cart, or payment step. This helps you spot UX issues, shipping fee shocks, or missing trust signals.
It also highlights which products or collections bring in conversions, so you can double down on top performers and improve underperforming listings.
Make Shopify Growth Decisions Based on Facts
Want to scale Meta Ads or test a new channel like Pinterest? Without conversion data inside Shopify, you’re guessing.
With it, you can confidently plan promotions, justify ad budgets, and predict cash flow, because every decision is based on numbers, not assumptions.
How to Set Up Google Ads Conversion Tracking on Shopify
There are two main ways to implement conversion tracking on Shopify: manually setting up with Google Tag Manager (GTM) or using the TagFly app, which simplifies the process with a prebuilt GTM container.
Option 1: Manual Setup with Google Tag Manager (GTM)
⚠️ Notice: Manual GTM Setup requires you to add code snippets and configure tags yourself. If you are not able to code or set up things technically, this might turn into a great bill of time and errors. Unless you want this procedure entirely under your control for customization, aided solutions (TagFly, for example) will be more user-friendly and safer.
Step 1: Create a GTM account and container
Create an account for Google Tag Manager. A web container is added for your Shopify store (GTM-XXXXXX).
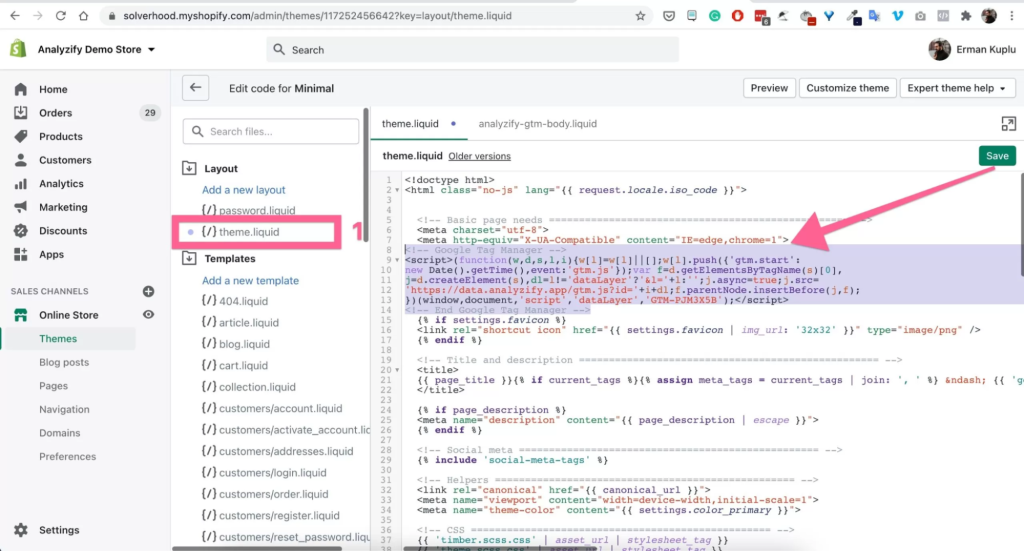
Step 2: Add GTM snippets to your Shopify theme
From the Shopify Admin, switch to Online Store > Themes > Edit Code > theme.liquid.
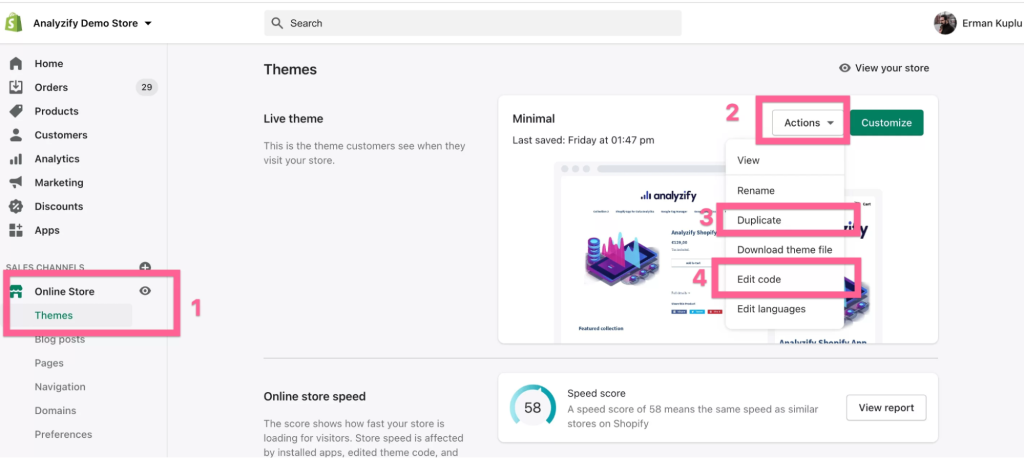
Paste the header snippet right after the <head> tag and the body snippet right after the <body> tag>.
Step 3: Install conversion tags via GTM
In Google Ads, go to Tools & Settings > Conversions > “+ New Conversion Action”. Choose Website, then copy the event snippet.
In GTM, go to Tags > New > Custom HTML, paste the snippet, and denote the trigger (for example, when the URL contains /checkout/thank_you).
Step 4: Test and publish your GTM setup
Use GTM’s Preview Mode to check if tags fire correctly on the Thank You page.
Finally, confirm the setup with Google Tag Assistant or Ads’ conversion diagnostics.
Option 2: Use the TagFly App (No Code Needed)
If you want an easier way to track conversions on Shopify, TagFly lets you connect Google Ads, Meta, TikTok, and GA4 in just a few clicks.
For Google Ads, TagFly sends conversion events directly via API, so your tracking works reliably even with iOS restrictions or ad blockers. No GTM setup required.
Step 1: Install the TagFly app from the Shopify App Store.
Step 2: Connect your ad platforms: Google Ads (via Conversion API), Meta, TikTok, or GA4.
Step 3: Enable server-side tracking so purchase events and customer actions are captured reliably, even with ad blockers or iOS restrictions.
Step 4: Verify the setup in your ad platforms and start seeing accurate conversion data.
>>> Learn More: How to Set Up Google Tag Manager on Shopify: A Complete Guide
How to Set Up Google Analytics Conversion Tracking on Shopify
Unlike Google Ads tracking, which is mainly for campaign optimization, GA4 lets you analyze the entire shopping funnel, from product views to purchase, so you can spot where customers drop off and which products convert best.
Step 1: Create a GA4 property and get your Measurement ID
Go to your Google Analytics account, create a new GA4 property, and add a Web Data Stream for your Shopify store. Copy the Measurement ID that starts with G-XXXXXXXX.
Step 2: Add the Measurement ID in Shopify
In your Shopify Admin, go to Settings > Customer events > Add custom pixel > Google Analytics 4. Paste your Measurement ID here, and Shopify will automatically start sending key ecommerce events to GA4.
Step 3: Enable Enhanced Ecommerce in GA4
In GA4, make sure Enhanced Measurement is turned on for your data stream. This allows GA4 to capture standard events like view_item, add_to_cart, begin_checkout, and purchase.
Step 4: Test your setup with DebugView
In GA4, open Configure > DebugView and simulate actions in your Shopify store (e.g., add to cart, complete checkout). If everything is set up correctly, you should see these events appear in real time.
👉 For more advanced tracking, you can also connect GA4 through Google Tag Manager or use apps like TagFly to enable server-side tracking. This gives you more flexibility, ensures better data accuracy, and helps you stay compliant with privacy regulations.
Best Practices for Conversion Tracking on Shopify
To get the most out of your conversion tracking setup, it’s not enough to just install tags. Following best practices will help ensure your data stays accurate, actionable, and ready to fuel smarter decisions.
1. Use Both Google Ads and GA4 Together
As conversion tracking in Google Ads makes telecast to the campaigns that drive sales, GA4 helps one visualize the whole customer journey. Putting the two to work together will give you performance data for the campaigns and greater insight into the funnel.
Besides, having both in place serves as cross-verification. Doing so lessens blind spots and also lets you confirm whether some discrepancies are truly just differences in attribution modeling or if they’re due to a technical hiccup.
2. Regularly Test and Verify Your Tracking
It’s not uncommon for tracking to break after theme updates, checkout changes, or app conflicts. Make it a habit to test conversion events regularly, especially purchase tracking.
Additionally, tools like GA4 DebugView and Google Tag Assistant further help with early problem detections, so keep verifying your setups to avoid losing critical sales data.
3. Leverage UTM Parameters for Campaign Analysis
UTM parameters allow you to track the exact source, medium, and campaign behind each order so that you can view which channels and ads bring the best ROAS.
More importantly, UTMs will ensure your GA4 reports are telling the same story as your Google Ads reports. Without these, you might be misattributing conversions or lose the ability to keep track of high-performing campaigns.
4. Keep Your Tracking Privacy-Compliant
Customers expect brands to treat their data with care. Always set up your tracking to comply with laws like GDPR or CCPA. With that in mind, regulate what data is shared with your customer through tools like TagFly, creating a barrier that sustains customer goodwill yet obtains adequate insights.
FAQs about Conversion Tracking on Shopify
1. Do I need to track conversions in both Google Ads and GA4?
Yes. Google Ads tracking is necessary to handle campaign optimization and smart bidding, and GA4 gives a full view of customer behavior across your store. By using both, you can optimize your ads and then understand the bigger customer-shift journey.
2. Why do my conversion numbers look different in Google Ads vs GA4?
Discrepancies inevitably occur because Google Ads and GA4 use different attribution models and reporting periods. Google Ads will attribute conversions to clicks on ads, while GA4 might measure the various stages of the journey. You can look at the attribution setup in each tool to shed some light on the differences.
3. Can I track offline conversions from Shopify sales channels?
Yes. In cases where you sell on other channels, such as a POS or marketplace, you can import offline conversions into Google Ads or GA4. You will have to export your order data and upload it either manually or use apps that will sync offline sales for you.
Conclusion
Setting up conversion tracking is perhaps one of the greatest things you will do to grow your Shopify business. Conversion tracking on Shopify will let you know what campaigns actually sell, how your customer journey operates, and what changes to make as well-informed parties.
Whether it is a GTM manual setup, facilitated by TagFly, or a GA4 setup for advanced analytics, the single most important thing is that your data is accurate and reliable. Following best practices first would certainly allow your ads to perform better and be seen by many.